Yogurt Cheesecake

Easy Yogurt Cheesecake Recipe
Yogurt Cheesecake...sounds odd doesn't it? It works!
I discovered Yogurt Cheesecake when I came across Easiyo yogurt maker - I very, very easy, simple, cost effective way to make your own yogurt. I haven't looked back since. The yogurt is so versatile and Easiyo have created extra sachets to transform your gorgeous yogurt into other yummy recipes - such as ice cream, mousses and cheesecake! I still marvel when I think I can make such a thing as yogurt cheesecake! Amazing!
I love cheesecake, so eagerly seized my opportunity to make some as soon as the sachets arrived. So, here for you, is a very easy to follow guide, how to make your very own simple yogurt cheesecake.
You can buy your own Easiyo Yogurt system from Amazon.com now
Or if there simply isn't enough choice from Amazon.com, you can buy your Easiyo Yogurt maker from the UK, and get a HUGE choice of flavours, pots and sachets...all from Amazon.co.uk

Ingredients
- 150 g digestive or ginger nut biscuits
- 50 g unsalted butter
- 2 tbsp water
- 500 g Yogurt (ideally from Easiyo)
- 1 Sachet of Easiyo Cheesecake Mix
- A topping of your choice (I use Easiyo Fruit Squirt)
- A sprig of mint/A berry/A piece of Chocolate...something for a lovely garnish
Instructions
I decided I wanted to make my cheesecakes in small ramekin pots - to make individual portions of lovely yogurt cheesecake. But of course, you can make them in a cake tin - I advise you to use one that has a removable bottom, so you can lift it out easily - and don't forget to grease it!
So, on with the recipe...
I took:
7 digestive biscuits and
8 Ginger Nut biscuits
(approx 150g of biscuit goodness), and placed them in a plastic bag, and pounded them with a rolling pin (it was very therapeutic).
Once all the pieces of biscuit were crushed up, I placed 50g of Unsalted Butter and melted it on a low heat, then mixed the crumbly biscuity goodness in with it.
I found that the butter wasn't quite enough, so to save the calories, I also added to 2 tablespoons of water, to help bind the biscuit and butter mix.
Once this was done, I added about 3 teaspoons of the mixture into each ramekin pot, and pressed it in, so it was packed in tightly.
Then, I put them in the fridge to chill (...this is the hardest part of the recipe done, so go now you can reward yourself with a cup of tea, or as I did, a big glass of red wine!)
Step 3 - Make Your Yogurt Cheesecake Filling...mmmm

So, once you've made your Yogurt (as you can see, I make my Yogurt with Easiyo - quite simply the easiest way to make Yogurt I've ever come across, no electricity needed or anything, it's so easy and simple), you will need 500g of Yogurt. I used plain, but obviously, you can used flavoured yogurt to make a flavoured cheesecake.
Add the yogurt to a bowl, and add to it 1 sachet of Easiyo Cheesecake mix. For best results, if you're using Easiyo yogurt, use it still warm, not chilled.
Stir it slowly to start with (probably best to use an electric mixer), then spend a good few minutes whipping and stirring until it is smooth and creamy in texture.
Once you've chilled your biscuit based ramekins, take them out of the fridge, and add the cheesecake yogurt mix to them. I added approx 4-5 teaspoons of the mix to each ramekin - but you can add less or more, as you wish.
Once you have distributed your yogurt cheesecake mix, put them back in the fridge to chill for at least 3 hours before serving.
Step 5 - Add a topping to your Yogurt Cheesecake!

You can add whatever topping you choose to the top of your yogurt cheesecake - of course, you can just have it plain.
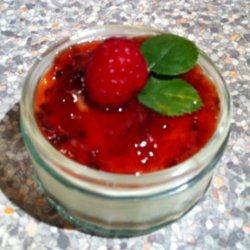
I add Easiyo Fruit Squirt to the top - here I've chosen BerryFruit Fruit Squirt, but you add chocolate, toffee, lemon, strawberry - your options are endless! The Fruit Squirt is so easy to add, it's like a jelly texture, just squirt it on, spread it around...add a bit of fruit for garnish - and you're done!
You can see from the picture, that the yogurt cheesecake comes out firm, but still with enough cheesecake fluff, that makes it so creamy and yummy. See, I told you it was simple!
More Yogurt Cheesecake recipes...
If you don't have an Easiyo Yogurt maker...or the Easiyo Cheesecake sachets...you can make a cheesecake with yogurt in other ways. Here are a few links that will point you in the right direction.
- Recipe: How to Make Yogurt Cheesecake
Try this yogurt cheesecake recipe for a slightly tangy, lighter, and healthier alternative to traditional cheesecake made with cream cheese. - Yogurt Cheesecake from Mealsmatter.org
Yogurt Cheesecake recipes courtesy of mealsmatter.org - Vanilla Yogurt Cheesecake from Baking Bites
An icebox cake gets its name from the fact that this is not a cake that is baked, but one that sets up in the refrigerator - Greek Yogurt Cheesecake Recipe - Eat, Live, Run
Greek Yogurt Cheesecake with Peaches and Honey by jenna on August 3, 2011 - See a Yogurt Cheesecake recipe from Youtube
If you're craving for sweets but you don't want to cook anything, this no-bake recipe by Deb is right for you: the yoghurt cheesecake.
I bought my Easiyo Yogurt maker for about $40, and haven't looked back.
Not only have I saved money by being able to make my own yogurt, but it's a lot of fun too.
It's so easy to make. I usually prepare a batch before bed, leave it overnight to set, then in the morning it's ready!
The best things I've found about owning my Easiyo Yogurt Maker is:
- It's so easy to make fresh Yogurt. Simple add the dried Yogurt mix into your Easiyo Pot, add water up to the mark, add the lid and shake. Fill up your big container with hot water, put the pot in the container, leave for 8 hours+...DONE!
- It's very satisfying knowing that I'm making my own foods.
- It's so versatile...you can eat it with anything you fancy, you can cook sweet and savoury food with it.
- Easiyo make so many different products for your Easiyo Yogurt maker, there are so many options and flavours to try.
- As well as yogurt, you can use the Easiyo system to make cheesecake, mousse and even ice-cream!
- You didn't need to plug anything in...it uses no electricity, so it's good to the environment
- Once you've made the Easiyo Yogurt, it can last up to 2 weeks in the fridge. Brilliant!
- It's good for you! A great source of calcium...plus it's not very fattening at all
See how easy it is to make yogurt with Easiyo!
Easiyo is such a versatile Homemade Yogurt system, they've even produced their own Cookbook!


")